Hello everyone,
We just tried Tutor K8s on Minikube, and we would like to share it on this platform. May be that’s can be useful for someone 
Sincerely,
Murat
Tutor Kubernetes deployment
Tutor deployment on local Minikube cluster:
Kubernetes is advanced challenge, but it’s very handy tool and technology for Docker based platforms, such as Tutor. In this documentation we will be try to deploy Tutor/Open edX on local Kubernetes cluster, which is Minikube. Host machine is Linux Ubuntu 20.04 LTS for this case.
Requirements:
-
Docker and Docker-compose
-
Tutor
-
Minikube with Virtualbox or Hyper kit on MAC, Hypervisor on Windows
-
Ingress Controller
We assume that, you are already running Tutor Juniper on your local machine. If you not https://docs.tutor.overhang.io/quickstart.html#quickstart-1-click-install
Minikube :
You can find documentation for installation of Minikube on different platforms:
After installations to start Minikube run:
$ minikube start --driver=virtualbox --memory=7000MB --cpus=2
Minikube will create one node cluster on Virtualbox, with 7GB RAM and two dedicated CPU. Which is enough to run Tutor on this cluster. To verify it run:
$ minikube status
m01
host: Running
kubelet: Running
apiserver: Running
kubeconfig: Configured
To install Tutor we must configure domain and DNS names, to do so run:
$ minikube ip
192.168.99.107
$ sudo nano /etc/hosts
127.0.1.1       mppc
127.0.1.1       localhost
127.0.1.1       local.overhang.io studio.local.overhang.io discovery.local.overhang.io
192.168.99.107  solo.io cms.solo.io discovery.solo.io preview.solo.io minio.solo.io
The following lines are desirable for IPv6 capable hosts
::1     ip6-localhost ip6-loopback
fe00::0 ip6-localnet
ff00::0 ip6-mcastprefix
ff02::1 ip6-allnodes
ff02::2 ip6-allrouters
In this example LMS host will be “solo.io” and CMS host “cms.solo.io” , edit and save.
Kubectl:
By default, kubectl gets configured to access the kubernetes cluster control plane inside minikube when the minikube start command is executed.
But if kubectl is not installed locally, kubectl can be used inside the minikube also
$ minikube kubectl -- get namespaces ## for example
You can also $ alias kubectl="minikube kubectl --" and next time just run kubectl
Ingress Controller:
In order to access your platform, you will have to setup an Ingress controller. Instructions vary for each cloud provider. To deploy an Nginx Ingress controller, it might be as simple as running:
kubectl apply -f https://raw.githubusercontent.com/kubernetes/ingress-nginx/nginx-0.30.0/deploy/static/mandatory.yaml
kubectl apply -f https://raw.githubusercontent.com/kubernetes/ingress-nginx/nginx-0.30.0/deploy/static/provider/cloud-generic.yaml
We have to enable Ingress, and in addition to Dashboard for GUI interface of Kubernetes.
$ minikube addons ingress
$ minikube addons dashboard
$ minikube addons list
For local Kubernetes to enable dashboard is easy to configurations of available ports. But in production deployment is not god idea to enable dashboard. Because someone can easily hack it, therefore is not recommended for production environments.
$ minikube dashboard
Tutor deployment:
Stop existing platform
$ tutor local stop
Pulling all images from Docker registry
$ tutor images pull all # (optional)
Running first installations:
$ tutor k8s quickstart
If everything has been installed properly you should see “Green” status on dashboard
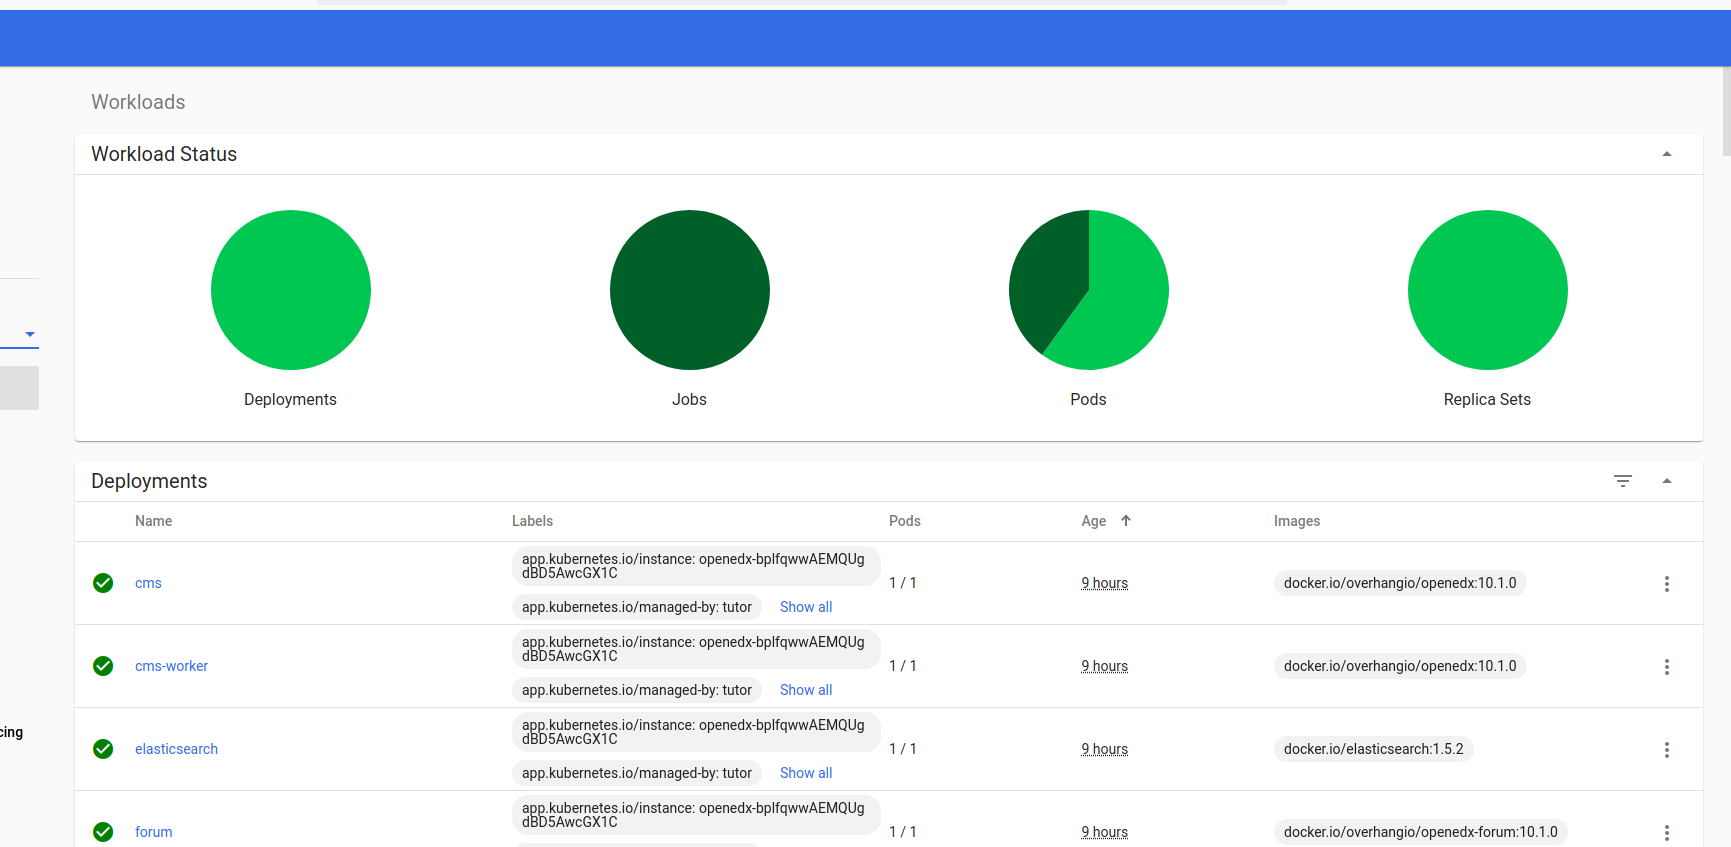
It’s mean that all services, deployment, pods, jobs etc. is OK. If it’s not, you must check logs on dashboard or from CLI.
$ tutor k8s logs lms  # for example
$ tutor k8s  - - help**    # to see other available commands
Ingress/Nginx:
Now all installation process has been completed, but it’s not enough to browse all service and applications from outside of the Nodes. We must expose all deployments, services. There are other methods also available, but for this case Ingress Controller will be used.
To do that:
Kubernetes dashboard -> side menu -> Namespace -> openedx than,
Side menu -> Discovery and Load Balancing -> Ingress
From top-right navigation bar click plus (+) button paste all codes bellow to the YAML file than click Upload button.
Ingress.yml
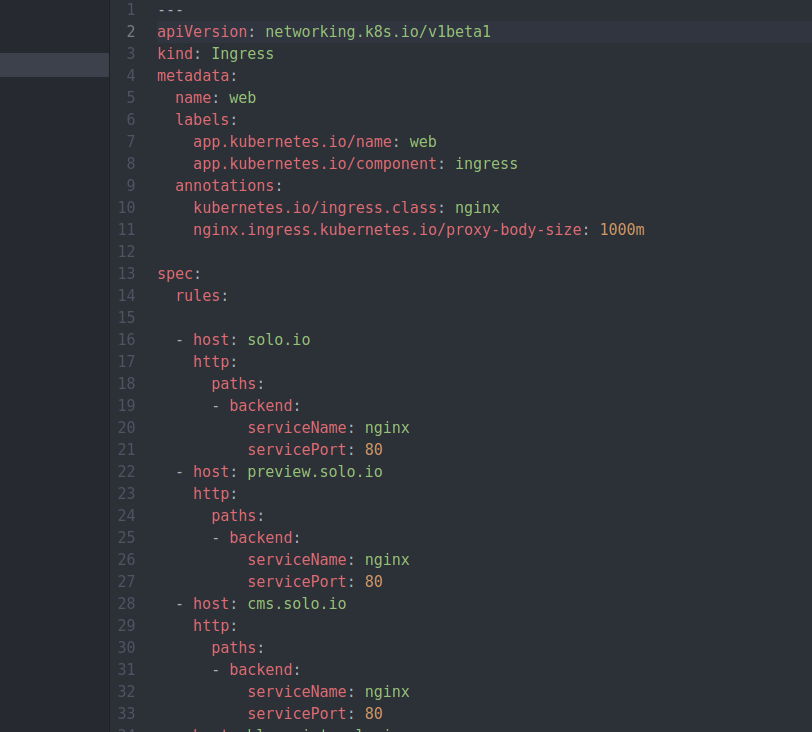
Now Open edX should available on browser http://solo.io
#############################
Important note:
-
If you deleted Minikube (
$ minikube delete), you should check Minikube IP with run:$ minikube ip
If there is some differences, you have to update /etc/host file.
- If you deleted Kubernetes Pods, Services, Deployments etc. (
$ tutor k8s delete), you must recreate “Ingress.yml”.
###########################
Plugin Installation:
Tutor Discovery plugin:
Add your discovery subdomain to “ /etc/hosts” file (discovery.solo.io)
$ pip3 install tutor-discovery
$ tutor plugins enable discovery
$ tutor config save
$ tutor k8s quickstart
If there is some “error” or “failed” message, run:
tutor k8s logs discovery --tail 100
tutor k8s logs discovery
Than you must edit “ingress.yml” file for input and output domain traffic. To do so add codes below to the ingress.yml than click update/upload button to save it.
host: discovery.solo.io   # (sorry for indentations and YAML format, not working for me now:)
http:
    paths:
    - backend:
        serviceName: nginx
        servicePort: 80
Create superuser:
tutor k8s  exec discovery bash
./manage.py createsuperuser
Re-indexing courses
./manage.py refresh_course_metadata --partner_code=openedx
./manage.py update_index --disable-change-limit
DONE